Setting up the environment
Before you get started with the Abstract SDK, you will need to set up your development environment. This guide will walk you through the process of setting up your environment and creating your first Abstract app module.
Rust
To work with the SDK you will need the Rust programming language installed on your machine. If you don’t have it installed, you can find installation instructions on the official Rust website.
WASM
Additionally, you will need the Wasm compiler installed to build WASM binaries. You will need rustup, which you got
when installing Rust on the previous step. To install it the Wasm compiler, run:
$ rustup target add wasm32-unknown-unknown
> installing wasm32-unknown-unknown
Git
You will also need git installed to clone our template repository. You can find instructions for installing git on
your operative system here.
IDE
You will need an IDE to write code. Here are a few options we recommend:
Recommended tools
- Rust Analyzer: Rust Analyzer is a language server that provides IDE support for Rust. If you use VS-Code it’s highly recommended.
- Intellij Rust Plugin: open-source Rust plugin compatible with all IntelliJ-based IDEs. You are going to need it if you are using the Intellij IDEA Community Edition IDE, however it’s not needed for the Rust Rover.
- Docker: Our testing infrastructure uses Docker to run the tests. If you want to run the tests locally, you will need to install Docker.
- Just: Just is a command runner that we use to improve the development flow. You can install it by following the instructions on the Github repository.
Using the Template
Time to start building! We’ll get you set up with the Abstract App template which contains:
- A scaffold app module with:
- A basic contract
- cw-orchestrator interface and deployment script
- Integration tests
- A scaffold front-end with:
- A basic UI
- A basic API client
- A set of just commands that will boost your productivity.
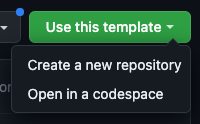
Go to our App Template on Github and click on the “Use this template” button to create a new repository based on the template. You can name the repository whatever you want, but we recommend using the name of your module.
Go ahead and read through the readme of the template repository to learn how it is structured. It contains instructions
on how to set up your
development environment, useful commands you can perform using just, how to test and deploy your app, and more.
Contract layout
The template contains a scaffold contract that you can use as a starting point for your own contract. The contract is
located in the src directory and is structured as follows:
contract.rs: This file is the top-level file for your module. It contains the type definition of you module and the const builder that constructs your contract. It also contains a macro that exports your contract’s entry points. You can also specify the contract’s dependencies here.error.rs: This file contains the error types that your contract can return.msg.rs: This file contains the custom message types that your contract can receive. These messages also havecw-orchestratormacros attached to them which comes in useful when you are writing your integration tests.state.rs: This file contains the state types that your contract will use to store state to the blockchain.interface.rs: This file contains the interface that your contract will use to interact with thecw-orchestratorlibrary.replies/: This directory contains the reply handlers that your contract will use to handle replies.handlers/: This directory contains the message handlers that your contract will use to handle the different messages it can receive.
If there’s anything you don’t understand about the template please don’t hesitate to reach out to us on our Discord server.
Front-end layout
To generate the front-end scaffold, you can run just ts-codegen, which will run a code generation script for you found
in the typescript/scripts folder. The code generation script will generate TypeScript code based on the specifications
defined in the contract schemas.
Once the script is complete, you will find the newly generated code under typescript/src, and it’s structured as
follows:
index.ts: The index file bundles and exports all the functionalities from the generated files (Template.types, Template.client, Template.message-composer, Template.msg-builder) under a single namespace called contracts, making it easier to access the various functionalities encapsulated in the other files.Template.client.ts: The client file contains classes for creating client instances to query and interact with a blockchain module. These client instances can be used to retrieve module configurations or to connect a signing client for transaction functionalities.Template.message-composer.ts: This file aids in crafting messages necessary for interacting with a specific blockchain contract, particularly for updating configurations. It contains a class that generates message objects that can be sent to the blockchain for execution.Template.msg-builder.ts: In this file, abstract classes provide static methods to create message objects for querying or executing actions on the blockchain. It essentially facilitates the building of structured messages for blockchain interactions.Template.types.ts: The types file defines various data structures and types that represent the structure of messages and responses within the blockchain module, aiding in maintaining consistency across different operations in the module.
Tools used in the template
The following Rust tools are used extensively in our template to improve your productivity.
- Taplo: The CI shipped with the
template will perform formatting checks. To ensure you pass the checks, you can install Taplo and use
the
just formatcommand to format your code and toml files. - Nextest: A better cargo test runner.
- Cargo Limit: Prioritizes errors over warnings in compile output as well as some other small improvements.
- Cargo Watch: Allows you to automatically re-run compilation when files change. This is useful when you are working on the contracts and want to fix compiler errors one by one.
You can install them by running just install-tools. All the tools are built from the source by Cargo.